
Learn how to format text in your posts and pages. The editing tools are the same whether you’re editing a post or a page on your site. Use these tools to change the way your content appears on screen and to add links to other pages and websites. Take some time to familiarize yourself with these basic tools.
IF YOU’RE HAVING TROUBLE WITH FORMATTING see item #9 for a nifty trick.

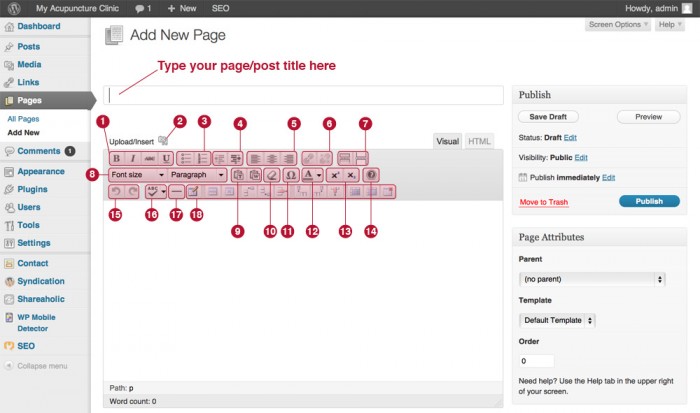
#1 – Bold, Italic, Strikethrough, & Underline
Use these to add emphasis to your text.
#2 – Upload & Insert Media (including images, PDFs, & other documents)
Click this button to add a picture to your post or to upload and insert a document such as a patient form. For more information on uploading images, visit: https://apw.zendesk.com/entries/20847088-how-to-add-images-to-a-page-or-post
#3 – Bullet/Numbered List
If you want a bulleted or numbered list, these are the buttons you’re looking for! For bullets, click the one with the dots (on the left) and for a numbered list, click the one with the numbers (on the right).
#4 – Outdent/Indent
Nudge your text to the right by clicking the indent button (on the right). If you want to nudge it back to the left, click the outdent button (on the left).
#5 – Text Align (Left/Center/Right)
Use these buttons to align your text to the left, right or center.
#6 – Hyperlink
Use these buttons to make and break hyperlinks to other websites or other pages within your website. Select the text you want to turn into a hyperlink then click the make hyperlink button (the one on the left/the one with the complete chain). A window will appear where you can enter the web address (URL) of the page you want to link to. Click “Add Link” and the link will be added to your selected text. If you want to delete a link, select the link you want to delete and click the delete hyperlink button (the one on the right/the one with the broken chain).
#7 – More Tag/Page Break
A “More Tag” is a marker in your blog post so that when the post shows up on your site, the text before the tag marker will show up and the user will have to click “Continue Reading” to read the rest of the post. A “Page Break” will split your post into multiple pages. The user will have to click to the next page to continue reading after a page break marker.
#8 – Font Size/Paragraph Style
Use the font size menu (on the left) to select a different type size. Use the style menu (on the right) to select a different format style.
#9 – Paste (Plain Text/Paste from Word)
There are two different paste buttons available. The one on the left that has a “T” on it will paste copied text as plain text. Nifty trick: The paste button on the right has a “W” on it. This one will paste text copied from Microsoft Word and maintain any formatting applied to the text. If you are having trouble using the formatting tools here but can do alright in Microsoft Word, draft your post or page in Word and then copy and paste it to your site using the “Paste from Word” button.
#10 – Clear Formatting
This button will erase any formatting changes you have made to the text and restore the text to it’s default state.
#11 – Insert Special Character
This tool allows you to insert a special character such as £, ©, ♥, and many others!
#12 – Change Type Color
Want some blue type in your post? How about red? Select a color by clicking the down arrow and choosing from the pop-up menu. Select the text you want to change and then click the type color button.
#13 – Superscript/Subscript
If you need to superscript something, select the text you want to superscript and click the button on the left (the X with the 2 above it). If you need to subscriptsomething, select the text you want to subscript and click the button on the right (the X with the 2 below it).
#14 – Help
Brings up WordPress’s “Rich Editor Help”. You might find it to be of use so it’s worth checking out.
#15 – Undo/Redo
Undo the last thing you did. If you undid something you actually wanted to keep, there’s always redo.
#16 – Spell Checker
Don’t forget to click here to check the spelling in your post/page!
#17 – Insert Line Break
Draws a line across your post/page to separate content.
#18 – Table Formatting
If for some reason you need to include a table on your site, these are the buttons you want to play with. They will insert a table, change cell properties, add/remove columns/rows, and split/merge cells.
Video – Basic Formatting:
Topics covered in this video:
- text styling options
- bullets & numbering
- text align
- hyperlinking
- font size
- paragraph styles
- undo/redo
- spell check
[youtube]http://www.youtube.com/watch?v=rLh1U03ZusE[/youtube]
Video – Advanced Formatting:
Topics covered in this video:
- indent & outdent text
- insert more tags & page breaks
- insert special characters
- change type color
- superscript & subscript text
- insert a line break
[youtube]http://www.youtube.com/watch?v=DNTrpxwugY0[/youtube]